
Let's create sustainable crafts together.
- Apr 21, 2024
- 4 min read
Whether you're looking to treat yourself or a loved one, my Make-your-own Pin Cushion kit or Wool Scrap Bag is a thoughtful and sustainable craft kit worth considering.
By using up my leftover wool pieces from making my hot water bottle covers, I can create eco-friendly craft kits that help me run a more sustainable business. These kits are perfect for those who enjoy crafting, as they offer a fun and mindful project.
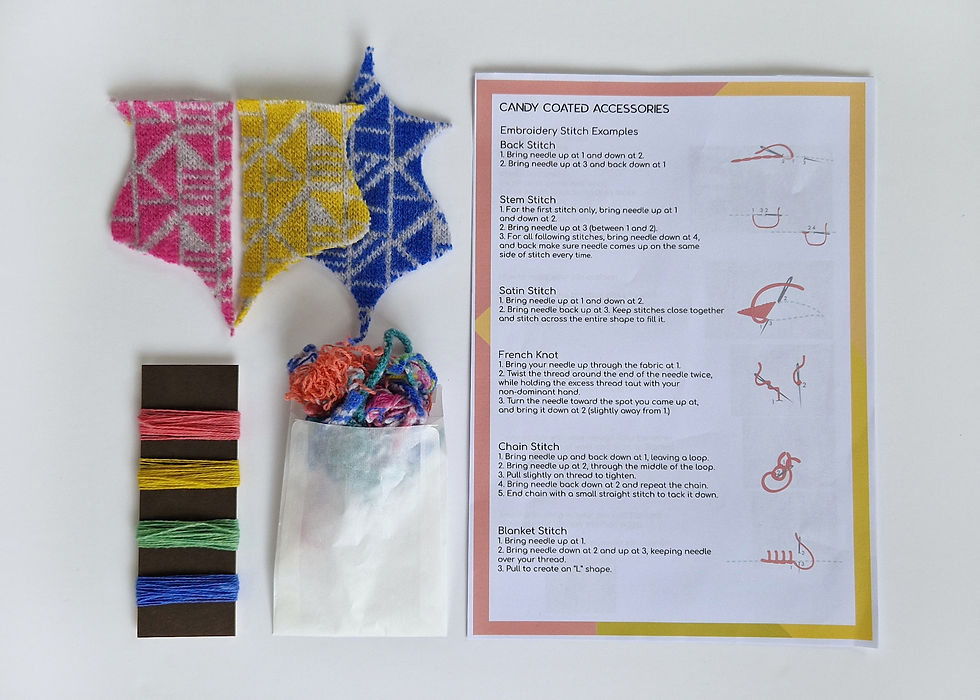
What's inside the kit
Let's take a look inside my Pin Cushion kit and see what it contains.
What your pack includes -
3 x Pieces of patterned wool.
Two that match back-to-back to make your pin cushion. One to practise your design on first.
1 x Lambswool yarn card with 4 shades to embroider the front of your pin cushion with.
1 x Small envelope of waste wool for stuffing.
1 x How to step-by-step guide.
What you’ll need from home -
A large darning needle
A pair of scissors
Your imagination
Let's get started...
Begin with the practice piece of wool - the odd-shaped one out of the three. Use this piece to experiment with different embroidery stitches, either following the examples shown on the instruction sheet in your kit or trying some of your own. Keep in mind that you can create thicker stitches by using a double end of yarn.

After you have finalised your embroidery stitch ideas and have a clear picture of what your final cushion design will look like, choose one of the matching pattern pieces and start embroidering it. This embroidered piece will be the top of your finished pin cushion.

Once you have finished your design, take the corresponding back piece of wool and place the two pieces back to back. You can then proceed to blanket stitch the edges together, leaving a small opening approximately 1 inch wide to insert the stuffing. Fill your pin cushion with wool stuffing, using as much as needed to fill the cushion. Once you have added the stuffing, close the small opening with a blanket stitch to secure it.

Congratulations! You have successfully completed crafting your very own stunning pin cushion, Yay!

Embroidery Stitch Examples
Here are six embroidery stitches that you can use to create the design on your pin cushion. Feel free to try these out, or experiment with other stitches.
Back Stitch

1. Bring the needle up at 1 and down at 2.
2. Bring the needle up at 3 and back down at 1
Stem Stitch

1. For the first stitch only, bring the needle up at 1 and down at 2.
2. Bring the needle up at 3 (between 1 and 2).
3. For all following stitches, bring the needle down at 4, and back up at 2, making sure the needle comes up on the same side of the stitch every time.
Satin Stitch

1. Bring the needle up at 1 and down at 2.
2. Bring the needle back up at 3. Keep the stitches close
together and stitch across the entire shape to fill it.
Chain Stitch

1. Bring the needle up and back down at 1, leaving a loop.
2. Bring the needle up at 2, through the middle of the loop.
3. Pull slightly on thread to tighten.
4. Bring the needle back down at 2 and repeat the chain.
5. End chain with a small straight stitch to tack it down.
French Knot

1. Bring your needle up through the fabric at 1. Hold the yarn in your left hand and point the needle towards your hand away from the fabric.
2. Wrap the yarn twice around the needle, secure it with a finger, and insert it back into the fabric at the same spot.
3. Pull the loops tight against the fabric, around the needle as shown in 2, hold them in place and pull the yarn through the fabric slowly to form the knot.
Blanket Stitch

1. Begin by creating an anchor stitch: thread the needle and knot the end. Then, bring the needle up from in between the two fabric pieces about 8mm from the edge and pull the yarn through.
2. Insert the needle from the back at the same spot as you did at the front forming a vertical bar. Insert the needle under the anchor stitch at the top edge from left to right to begin making the blanket stitch.
3. Continue by inserting the needle from front to back at 1, about 8mm from the anchor stitch. Keep the needle inside the stitch loop and pull to form your first blanket stitch. Don’t pull too tight, just enough to run along the top of the fabric.
4. Continue in this way by bringing the needle down at 2 and up at 3 pulling it tight to form your next stitch.
So, if you enjoy crafting but need some guidance, my pin cushion kit could be perfect for you. For the more daring crafter, a scrap bag may be just what you need. The instructions provided in this Blog can be used to create pin cushions, lavender bags, decorations or any other craft project your imagination allows. Whatever you decide to do, have fun and enjoy the creative process.
In the meantime enjoy this fun video of me turning my wool scraps into a Pin Cushion Kit.


Comments